Powered by Blogger.

❤ Daria

This is just going to be a quick blog post on how I organized my documents binder. I can't take too many pictures obviously, as these are my personal documents but I will try to explain what I did.

To start with, I took (what I thought was) all my documents and went through every single letter. I realized that I still have quite a bit to put away.
I shredded all the stuff I didn't need (I had stuff from January 2012 in there!), and then I made piles of stuff, sorting them into little categories which were then going to get sorted into the binder.


The organizer thing I bought (I can't even remember what it's called) was actually plastic instead of paper which is amazing as they often wear off and tear but this one will last for ages. I had to stick on some labels though. They're slightly covered though, but you can still work out which section is which. I'm just gonna go through them for you, and explain roughly what's in each section.

Debt-This section sounds scary, I know, ha ha. But we all end up with things that somehow didn't get paid. Maybe it was our fault, or maybe it was the bank, either way, if I get a letter and I know something needs paying I put it in the debt folder and then I have all the information I need just to phone up or make a bank transfer and pay off the balance.
Contracts-This is pretty self-explanatory. It's where I keep all the contracts. Credit card contracts, broadband and phone contracts, and so on.
Important-I wasn't sure what else to call that section without making the name too long, but anyway, in that section I keep documents that I know I need to keep for a period of time, if not forever, and they safely just sit in the 'important' section of the binder.
Receipts/Warranties-One again, self-explanatory. I keep all my receipts in there, whether it's because I don't know if I'm keeping something or because I need a receipt in case an item breaks. I also keep all the warranties there. Any warranties I have, I take the receipt and staple it to the warranty certificate, and this way it's all in one place in case I need it. 
Statements-I keep 6 months worth of statements. I might actually start keeping up to a year worth of statements, just to be on the safe side.
Temporary-This is where all the 'in and out' files go. If I get a letter and I need to contact someone, it goes in there until it's done. If I get a hospital appointment letter, which tells you where to go, or and appointment that tells you what to bring, it goes in there. Basically just things that are moved in and out of the folder on a regular basis.

 That's it for my documents binder. It's really simple and once you get the hang of organizing your letter and documents, your life will become that little bit easier. I can remember being asked to bring a copy of a certain thing and I would always have to go to a bank, or phone up companies as I could never find what I was  looking for because all my letters and documents were literally scattered all over the place. There was stuff in the cupboard, on the table in the living room, upstairs, in kitchen drawers..! I still have a few bits and bobs to sort out but I already know where everything is and I know where to put things as I get them because they have their own category and space.You'll be amazed at what difference it makes.
I hope you found this helpful.

Loads of motivation from me to you,
Love, Daria xoxo

Share
Tweet
Pin
Share
No comments
Let me just start off by saying; I have that many organizing projects going on and so many different pictures taken at once I keep getting lost, ha ha. I need to delete pictures that I've already made a blog post about and then save them in some kind of order. I will definitely make a blog organizing section in my binder.. this is getting serious, ha ha!
Let's begin. 
I have a cupboard in my living room which I knew would be perfect for binders, documents, books and so on, but it was such a mess and it was so full of clutter I refused to look in it and didn't even think of cleaning it out. (The feeling I got when it was finished.. was amazing!) The cupboard is built into the wall so it's really out of sight almost and it even has a lock so you can lock it with a key, which I think is great, especially if I'll be keeping documents there.
I laid out ALL the documents, papers, contracts and stuff that I could find on the floor and then sorted it into little 'section piles' and that's how I decided what was going where in my new binder (which I will make a blog post about too, don't worry). Anyway, let's get to it, before I get going and write a book!

Here's a fraction of the stuff I had to go through just to get my binder organized, JUST the binder! I had a whole cupboard to clean out after that.

This is what the cupboard looked like before I started. I wonder how I let things get to that state! We did bring a toy box downstairs to the living room for William and it 'lived' in front of the cupboard door and nobody was in it for a while so that could be part the reason (his toys are organized now, and we're back to just having a box of toys in the living room, rather than half of his bedroom, ha ha)

There's no much to say about how I did this to be quite honest, as it depends on what you have in your cupboard. I did have two bins bags full of clutter though. I emptied the whole cupboard and once again sorted things into piles. I had piles like; stuff I can use for organizing (so empty binders, pockets, etc), cooking books, other 'uncategorised' books, binders, and a few more and then I just found a place for each category in the cupboard. I thought the cupboard was full! Turns out I have an empty shelf and a lot of space, now, after clearing it out.


Voilà! The finished product! I will explain what's on each shelf, starting from the bottom.


Shelf #1 - I had two old laptops that barely even work that I just keep for spares or repairs and they don't have a home, but they lived in that cupboard for a while so I thought I would let them live there for a bit longer but clean it up a bit. 
In the plastic bag, I put in all the chargers, cables, etc., so they are out the way and not getting caught/tangled on stuff.

Shelf #2 - Here I have all my binders. The black one is new and that's what all the binders are going to look like once I buy new ones. I will also probably stack them on top of each other because I don't think the cupboard closes properly now.
(From the left) I have my Organization Binder, which is where I keep all the stuff to keep my life organized; meal planners, exercise routine, pet log, exercise log, to do list and so one.
Documents binder, all my important documents, things I need to get sorted, contracts, receipts and other papers are in there.
The red one is a binder for my business (Daria's Boutique) stuff. I keep invoices, receipts and all that stuff in there, and the binder is seriously too small so I can't wait to get a bigger one!
The thin blue one is my pregnancy folder, so every time I have a doctor's appointment, appointment with the midwife, a scan, and so on, I take that folder with me.
The little black book is my planner. I actually have a big A4 one as well, I just haven't put it away yet. I keep all the appointments and stuff in there.
And last but no least, the little 'baby binder' is an address and telephone binder with everyone's addresses and telephone numbers in them. Obviously.

As for the stuff next to the binders I have organizing stuff at the bottom (empty pockets, organizers, etc), loads of big and small empty jotters and then two glossybox boxes on top which I think are amazing for organizing and so easy to stack on top of each other.
One is for cards; christmas, birthdays, etc and the other one I names as stationery, because that's where I'm keeping a spare pen, pencil, hole punch, label stickers and anything else I might need when organizing.

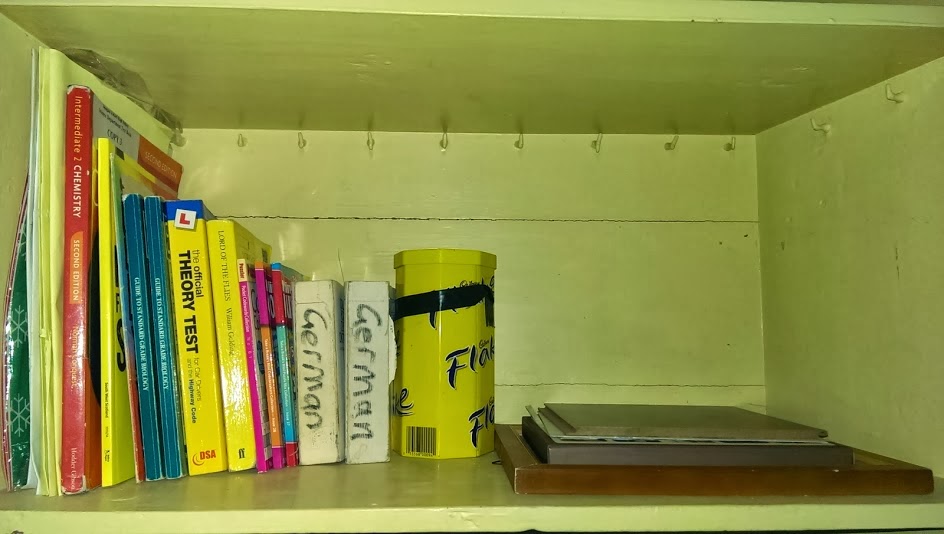
Shelf #3 - This shelf is pretty simple. I have a few books that aren't 'readable'. Basically books that are useful, but nothing you would read whilst lying in the bath(?), ha ha.
The yellow can is where I've been putting pennies. We need to save some up for when we go to Blackpool so William can have plenty for the two penny machines at the arcades. 
Next to that, there is just a picture, an experience day gift, and something else, I don't even know, ha ha.

Shelf #4 - This is where the cooking books are going to go I think. I already started my collection but I'm thinking about having half of it for cooking recipes and half of it for Avon related stuff. Being an Avon Representative is a 1 000 000x easier when everything is organized!

That's it for the cupboard. It took me forever to sort. If you didn't read the post, you probably just figured out what I did from the pictures, ha ha. But anyway, I hope you liked the post and I have more organizing posts lined up!

Loads of motivation from me to you,
Love, Daria xoxo
Share
Tweet
Pin
Share
No comments
The kitchen was in serious need of de-clutter! But it's all done now and I'm so happy!
The 'before' picture of the clutter drawer. This was half-organized once upon a time and then all of the stuff that didn't have a home ended up in this drawer.
Here's what happened roughly: There was two 'compartments' in there; one made of an old biscuit tin and one made from cardboard, ha ha. I put in two new compartments (which are really just CLEAN kitten litter trays, ha ha ha) and they fit perfectly! I was so happy!
The baking paper, cling film, etc., got moved to the cupboard below.
The recipe books don't live there any more and will live in my 'files and books' cupboard once it's done.
Some clutter got binned.
The rest got organized.


And here's the finished product. Looks completely different now! 
In the left compartment I have my baking and icing stuff; icing thingys that go at the end of the tub in an old candle holder, cookie cutters, mixer bits, silicon and paper cupcake cases. I'm sure there's other things I will find lying about. I bought a basket today so I will use that to put all the cookie cutters in and that should save some space too.
In the right compartment, I put all my cooking things in. I can't even think of what they're called! My brain is frazzled tonight after sorting out documents, ha ha. But anyway, they used to sit in a big jar at the window near the sink but it will be a lot neater if they 'live' in there, he he.

I had some cat treats so I put them in the space I had leftover and I put two pens (that I had leftover out of about 20 that I had to bin because they didn't work) in the space too.

My cutlery drawer was quite organized anyway. I forgot to take a before picture. The cutlery holder was 'along the way' instead of 'up the way' (if that makes sense) and the container was behind it. There was clutter in the container which I then cleaned out and I put William's cutlery in there instead. Can opener, peeler, etc are in the space that was leftover and of course all the cutlery is in the cutlery holder.

I feel like this blog post was so simple, ha ha. But it takes so much motivation to actually get up and do something. Reading other people's blogs and watching YouTube videos had really motivated me to organize my home, and trust me; once you start it gets easier, and easier. When you do have all your stuff organized, you'll feel so proud of yourself and so happy within! Life gets so much easier when things are organized and it makes you more motivated to do things. Believe me, I need a lot of motivation; running around after a toddler whilst pregnant and trying to keep the house clean.
It's also so much easier keeping the house clean when everything has a home. When things don't have a home, you put them in the next available, empty space and that's how you end up with clutter, and there's nothing worse than having to sit and dig through clutter and trying to organize it. So try to find a home for every item in your house, and most importantly, ask yourself if you really need half the stuff!

To a cleaner home!
Love, Daria xoxo


Share
Tweet
Pin
Share
No comments
I'm quite excited for this post, 'cos I am really quite proud of myself, he he. This cupboard was also organized, once upon a time..
Anyway, let's start.. because we all know what I'm like when I start talking/typing.

This is what the cupboard looked like before I sorted it. I had already lifted some stuff out before realising that I had to take a picture. There was that much clutter in there, I forgot I had half the stuff that I found, ha ha. 

This is the stuff that I took out the cupboard before I took the picture.

So let me just explain things a bit:
I took out every single item out the cupboard and cleaned all the shelves. I then tried to categorize everything that was going back in. Half way through I thought of putting drawers in one of the big cupboards in our home and keeping some stuff there and that's what we did. It saved so much space!

This is the finished product! It might not look that organized but everything is categorized..ish. I tried. I'm not really certain which category each thing came under so I made up my own categories, ha ha. 

-Top shelf: pasta, sweet sauces (syrup, honey, etc), cake decorations, baking sodas/powders, custard (i might have to move it to the bottom), sugars, flours, etc.
-Middle Shelf: Tea and Coffee, Instant Oatmeal sachets and Rice (I don't want them there but I haven't found a space/category/home for them yet), soy and stir fry sauces, spices.
-Bottom Shelf: (from the left) at the back we have some baby food that I have leftover that isn't out of date, rivita (it doesn't fit in the healthy snack box nicely), healthy snack box, sauces and spreads (brown sauce, nutella, etc.), gravy granules and seasoning, container full of different stock cubes, salt and pepper.

We have recently started organizing our meals and we have 5 'meals' a day. We have breakfast, snack, lunch, snack, dinner. I thought I would buy some healthy cereal bar and some nuts and I put them in that little container and labelled it. This way I can see when we're running out of breakfast bars and nuts.

In these containers, I keep everything that you can see names on the pictures. The containers aren't that 'nice', but I'll be ordering new ones, more stackable ones next week, which will look a lot neater.
The container with colourings/flavourings fits perfectly on top of the other containers which I didn't realise before, so that saved some space too!

To save space in the kitchen, as we have limited space already, we have put a chest of drawers in one of the cupboards in the house. The cupboard is almost just outside the kitchen so it's really easy to get to.
Next to the drawers there's also a big white bag. That big white bag is a big bag of potatoes, straight from a farm. They are definitely better than the potatoes you get from the shops!

I labelled two of the three drawers as I haven't decided what I want in the bottom drawer yet. I might put pastas or something in there, I'm not sure yet.

Tins/Cans drawer: The drawer is quite small, but it's holding this just now until we find a better space for them. I was thinking of building a big pantry organizer shelves (?) to fit the cupboard, this way we can keep most of the food in there and that will give us a lot more space in the kitchen.

Fast Food drawer: I wasn't sure what to call this drawer so I called it fast food, ha ha. The labels are easily changed so it's okay. Anyway, in this drawer I have pasta, noodles, cups of soup.. A lot of unhealthy crappy thing really.

I am so happy with how everything is coming together and I really can't wait to share the rest of the stuff with you!

How did I make the labels?
I just used masking tape. That's the paper-y kind of tape. I cut a bit of that, stuck it on and wrote on it. It's easy to remove and you can write on it with almost anything!

Loads of motivation from me to you,
Love, Daria xoxo

Share
Tweet
Pin
Share
No comments
Let me just start by saying; this cupboard was organized perfectly once upon a time. I'm not even sure what happened to it, but, it did get really messy. It got to the point where I didn't like going near the cupboard. Just the thought of trying to find something or get something out of there was frustrating! Sooo, I had to sort it. Here we go:

This is the 'before' picture. As you can see, things were just 'thrown in', everything was on top of.. everything! It was really disorganized! I'll explain what I did in the following picture.


This is the 'after' picture. It looks a lot more organized and it's definitely a lot more accessible.
Here's what I did:
-I binned anything I didn't use. There were three frying pans in there, really cheap ones, that didn't make it to my little 'hanging station' as I barely used them so I binned them. I never, ever used them and like I said they were really cheap! (I thought I was getting a bargain! No, no-terrible quality!)
-Tins: For now I have stacked the tins on top of each other. I'd love to have a different way for storing them, which I will find eventually but this will do for one. I put all the square pans on top of each other, biggest to smallest, and then I put all the smaller round tins inside the bigger one.
-Lids: I used an old cutlery holder as it didn't fit in out cutlery drawer. It has quite deep compartments so it's really great for holding the lids. I also hold cutting board in one of them compartments.

There was space at the side, so I used that space to store my knife sharpener but then I changed it about after the picture; I put the knife sharpener in one of the compartments and then I put my cling film, baking paper, etc., at the side and it all fits just perfectly.  

William was helping, of course. As usual, ha ha.

And this is how I keep my pots. I never did have a lot of cupboard space in the kitchen so I had to think of something. I bought a curtain pole (I think?) and then I bought a packet or two of hooks and that is where I hang my pots. They're out the way, it doesn't look cluttered and they are very easily accessible!
I did this a while back. Probably months ago, but I thought I'd post a picture anyway since it fits the post 'y'know. 

Kitchen organizing motivation from me to you,
Love, Daria xoxo

Share
Tweet
Pin
Share
No comments
You'll have to excuse my absence, I have been organizing everything like mad! But it's okay, because I've been taking pictures as I go along so there should be quite a few posts coming up. Today I organized all my documents and everything is in a binder nicely.
But let's talk about my kitchen worktops. I used to leave a lot of things on my worktops, things that didn't belong there and eventually I ended up with clutter. I've also never deep cleaned the worktops and all the appliances that live on them so that's what I did the other day.

These pictures might not look that bad, bud believe me, cleaning everything made such a difference!

This is the picture I took before. I had already started cleaning and then I realised I didn't take a picture, so I took one.

As you can see from this picture, the worktop was quite messy anyway. I cleared the worktop completely so I could get into every little corner. I moved the cans and the jars also, just not on this picture. I cleaned the worktop as well as the walls. I didn't realise how much residue there would be on the walls, especially where the kettle is. 
I then wiped every single  jar, because they were quite dusty. Cleaned the 'Tea, Coffee & Sugar' Cans. Cleaned the kettle as it had stains from it, and bits of chocolatey stuff from when I was mixing cake mixtures I guess (?).   

Here's the finished project. It doesn't look 'amazing' but it has made such a difference. There's no crumbs 'crawling out' from under the jars, kettle, etc. It's really easy just to wipe as I go and everything looks nice and clean. 

I have another two worktops to do, once I organize them I will post pictures/progress so you can see, but that's it for now.

Loads of love from me to you,
Love, Daria xoxo

Share
Tweet
Pin
Share
No comments
Hi guys!
If you've read my blogs before or watched my YouTube videos, you will know that I love subscription boxes. Now that I am pregnant, I have been searching for pregnancy subscription boxes and let me just tell you; there really isn't that many in the UK.
The subscription box I'm writing about tonight is called Project-B (www.project-b.com)

How does it work?
You can really easily buy a subscription or just buy a one-off box as a gift for someone who is pregnant or maybe just had a baby. The first Project-B box starts in month 4 of pregnancy, with a further six boxes up to month 10, which is a congratulations box for once your baby has been born. You can start your subscription at any stage and you'll only be charged for the boxes you receive.

What's in each box?
Each box comes with products, suitable for the specific stage of your pregnancy. Apart from the products you also receive information for the specific month, which is really handy and which I really didn't expect! The information covers:

  • Your pregnancy this month
  • Eating well this month
  • Staying active this month
  • Shopping ideas this month
  • and What's in your box this month
Let's get into it! My box got posted on the 1st February, which was a Saturday and arrived this morning, Monday. So the delivery is super quick, which I love! I will show you the box getting unwrapped, step by step. Oh, and let me just tell you.. it just gets prettier and prettier, ha ha.


This is what the parcel looked like when it arrived. I knew what it was straight away, ha ha! You'll definitely need scissors for that, there are five layers of it (i counted) but oh, it's so exciting.


This is the box right after taking the cover off it. It's really easy to open, you just pull the little strap and voilà!


As you open the box, you can see the 'what's in your box this month' leaflet, which has information about all the products, prices and where to get them from.


When you move the leaflet you can see this pretty packaging. It's really easy to get into the box.


I opened the box and I was so surprised to see these leaflets. They are all full of really handy information for the month and they actually look really cute.


This is all the leaflets from the box, as named at the start of this post.


And here are the products! The box is so beautifully packaged, I didn't want to move anything! 

I also took pictures of the products for you :)


*Nakd Cereal Bar
These are organic, healthy little snacks. I tried the cocoa mint first and then the strawberry. Unfortunately I didn't like the cocoa mint one, it was slightly overpowering but the strawberry one was delicious!


*WaterBaby Pregnancy Care Drink
You can get these in a citrus or cranberry flavour, I got the cranberry one. I was so surprised when I read that these bad boys are filled with the recommended daily intake of folic acid, as well as zinc and calcium. The drink was definitely suitable for a pregnant lady. It wasn't too sweet or bitter, it was really nice actually. And what a great way to get your folic acid if you're like me and you tend to forget to take it.


*Bergamot Organic Lip Balm, Pai Skincare
This was definitely one of my favourite products! It smells citrus-y, but it's very light and not over-powering. It's really nice consistency and that little pot would probably last a very long time. I've had mine on all day and I love it! One thing I also really like is that it doesn't make your lips taste funny.


*Palmer's Cocoa Butter Formula Massage Lotion for Stretch Marks
I wanted to try this out for so long but I've just never picked up a bottle and tried it, ha ha. I put this on today and it was so moisturising, but my favourite must definitely be the smell. It smells like cocoa (obviously). 


*Femfresh Feminine Freshness Deodrant
This isn't the type of deodrant I would normally use but I put it on this morning and I'm still not smelly so I guess it's good, ha ha. The smell of it is really light and you can definitely spray this without feeling sick!


*Pregnacare
I'm not even sure what to say about these, apart from the fact that I have seen them everywhere. I should probably start taking them, and if I like them, I'll get more. If no, I'll stick to the yummy WaterBaby Drinks, he he.


*Weleda Stretch Mark Massage Oil
I haven't opened these yet but when I do, I will write a review about them.

That's it for the box! It was so much fun opening it and trying out all the products and I am so excited for the next box. I just wish they would last a little longer, perhaps until your baby is one or two. Either way, I was really pleased with the box. For only £14/month you get a lot of great products, information and support. The customer service is great! I like how you can buy just one box as I gift, which I will most likely be doing soon! If you're interested, go to http://project-b.com You won't regret it! :)

And slightly off the subject this is the dinner I made today. You might be wondering what the little meat cubes next to my plate are? Well.. I cooked my kitty cat a whole pork chop (separately, as I didn't want any seasoning on it), i cut it up into little cubes and then heat up some milk and served it to my cat :) 


And now the cat is spread out on the bed, like a king whilst mummy types up this post.
I hope you enjoy it and I will 'see you' in my next post.

Baby dust from me to you,
Love, Daria xoxo


Share
Tweet
Pin
Share
No comments

  • Firmer boobs, bum and legs exercises. Exercising when pregnant.
Preparing For a Baby:

  • What To Buy For Your Baby - ALL You Need To Know

Project-B Subscription Box What's Inside (Pics) + Reviews:
  • Box 1 - Month 4 / 12-15 Weeks
  • Box 2 - Month 5 / 16-19 Weeks
  • Box 3 - Month 6 / 20-24 Weeks
  • Box 4 - Month 7 / 25-29 Weeks
  • Box 5 - Month 8 / 30-34 Weeks - COMING SOON!
  • Box 6 - Month 9 / 35-39 Weeks - COMING SOON!
  • Box 7 - Month 10 / baby's arrived! - COMING SOON!
Share
Tweet
Pin
Share
No comments
Hello there!
I feel so silly for not exercising when I was pregnant with William! I think I was made believe that exercise during pregnancy is very dangerous, which is not true. Don't get me wrong, there are cases where pregnant women should not exercise at all but this is not the case unless there is a high risk or something, I don't know, I'm not a doctor, ha ha.

So what made me look into exercising with this pregnancy?
When I was pregnant with William, my bum grew noticeably! And I was actually quite happy at that, because I have always preferred 'sticky-outy' bums to 'flat' bums. The reason I was worried was because with all that extra weight, it's only natural that it was going to sag and I really, really don't want that to happen! So that's why I put together exercises for my little bum, he he.
Then, I wanted bigger boobs (don't we all? ha ha). I had bigger boobs before I gave birth to William then I do now. Well.. maybe not now, because they're already filling out with this pregnancy but my boobs did become a lot smaller after breastfeeding William and I always told myself that if I have any more kids I won't breastfeed. Now that I am pregnant I can't even imagine not breastfeeding my baby to be, hence why I put together some boobie exercises, he he he. Those exercises help build your chest muscles (I think) which gives fuller and firmer looking breasts. I also drink a glass of soy milk (ew.) ever day or night, as i read that that can also help with increasing your bra size. I googled to see if it's safe to drink in pregnancy and it is. I google everything now, ha ha.
Anyway, what I was hoping was that my boobs get bigger whilst pregnant, and the exercises will help keep them there after i finish brestfeeding (fingers crossed!).

What have I missed out? Oh yes, legs!
I wanted exercises that help tone my legs because.. who doesn't want toned legs, right? Ha ha. I don't really have anything to say about this so, let's move on.

I searched the internet to find the workout that would suit my needs and eventually I just put a routine together myself, as it was easier this way. What I didn't like about googling the exercises was that a lot of the websites had only the name of the exercises and no pictures and I was just sitting at my screen, confused. That is why, I will try and find a picture for every exercise for this post!

Like I said, all these exercises are safe to do when pregnant but might get a bit more 'tricky' as you get further along. Let's begin!

1. Sumo Squats
I do 15 of these at the start and then another 15 at the end when I'm done with all the other exercises.


2. Lunges
I do 15 of these on each leg, so 30 all together. This exercise might get quite tricky once your bump gets bigger because you might struggle to balance but you can always use a chair to hold on to for extra balance.


3. Leg Raises
Leg raises sounds like the exercise where you lie on the floor and then lift your legs and tense your stomach muscles (?), but this is the one I do and it is really easy, even when pregnant!


4. Kickbacks
You can do these standing up but I do them as the picture above. Getting on your hands and knees in your last few weeks of being pregnant can be very beneficial!


5. Step-ups
This exercise is pretty self-explanatory.


6. Push Ups
I was very confused as to whether these are safe in pregnancy or not, but I did my research and the are safe! You can do normal push ups but I do them on my knees, and if that gets too hard, you can do it on the wall too.


7. T-planks
I love this exercise!


8. Chest Presses

I dont use weights, I try to just squeeze my muscles instead. I'm sure you can use weights as long as you're very careful and don't go extreme with 200kg or something, ha ha.


9. Elbow Squeezes
You do as the picture above and then bring your arms forward and squeeze. That's what I do. I'm not actually sure if that's what elbow squeezes are but that's what I do and you can really feel it work on all the chest muscles!

That's all for the exercises, I hope you all liked the post. If at any time you get abdominal or back pain or any pain at all, stop exercising. Don't try and push yourself too hard. Just remember, your body is already carrying a little life (I just cried a little..) so you don't want to strain it too much. Drink a lot of water and don't overheat. 
I'll see you in my next post.

Loads of strength from me to you,
Love, Daria xoxo


Share
Tweet
Pin
Share
No comments
Newer Posts
Older Posts

About me


Daria

My name is Daria and I am a 21 year old mum of two little boys.
Obsessed with reading, organising, fashion, fitness and makeup.
I am hoping for this blog to be my creative outlet and hopefully useful to some of you too.

Follow Me

follow me on twitter follow me on instagram follow me on pinterest

YouTube

Categories

  • Beauty
  • Christmas
  • Diaries
  • DIY
  • Fashion
  • Fitness
  • Food
  • Hair
  • Hauls
  • Home
  • Life
  • Motherhood
  • Organizing
  • Planners
  • Pregnancy
  • Promotions
  • Reviews

recent posts

Blog Archive

  • ►  2016 (2)
    • ►  January (2)
  • ►  2015 (2)
    • ►  March (2)
  • ▼  2014 (35)
    • ►  October (2)
    • ►  July (3)
    • ►  May (8)
    • ►  April (9)
    • ►  March (1)
    • ▼  February (11)
      • Documents and Papers: Making and Organizing a Docu...
      • Documents and Papers: Organizing a Cupboard for Pa...
      • Kitchen: Organizing Your Drawers
      • Kitchen: Organizing Food Cupboard / Pantry
      • Kitchen: Organizing Pots, Pans and Lids
      • Kitchen: Organizing Your Worktops
      • Pregnancy Subscription Box - Project B - First Imp...
      • Pregnancy
      • Firmer boobs, bum and legs exercise. Exercising wh...
      • Organize Your Life
      • Organizing Project 1 - de-cluttering the 'shoe cup...
    • ►  January (1)
  • ►  2013 (17)
    • ►  December (5)
    • ►  November (12)

Created with by ThemeXpose | Distributed By Gooyaabi Templates